Friday, December 28, 2012

Backlit Paintings

Desert Highway Backlit Painting by Charity Luthy
So, I mentioned in my previous post that I had handmade most of the Christmas presents I gave out this year. With the holidays past us, I can now share this process with you. One of the things I made for everyone on my "big presents" Christmas list were these back lit, 3D paintings.

Now, I have started spending more time than I really care to admit on Pinterest, and I see a LOT of things that I want to try doing. That being said, I'm a creative sort, and I always try to make my own spin on whatever I try to do.

So, I was on Pinterest this past spring, and I saw this really cool cloud painting:


...which I ADORE. Then, later, I saw another backlit painting, but this one had cutouts that let more light through. It was made out of metal, which is something I am not capable of working with, but it was so pretty that I knew that someday I would have to do it.

Nearing Christmas time, I saw on the 30 Days of Pinsperation feature on Pinterest that someone else had tackled the metal backlit painting, but done it smaller and with cardstock:


That's the original metal backlit art on the left and the cardstock version on the right.

The little wheels in my head got to turning, and I thought: "Why not combine the two paintings?"

So, I did.

First, I found a deal at Michael's (the craft store) for 7 canvases for $20, and then I bought 6 sets of battery powered Christmas lights from the Dollar Store. My original idea was to have the paintings battery powered so that they could be hung anywhere, not just in close proximity to a power outlet. You'll see why this changed momentarily.

Next, step: I printed out a bunch of designs onto pale green cardstock I had lying around:


Next, I cut the main images out of the cardstock:


Then, I made double-stick tape out of masking tape (just rolled it into little cylinders) and stuck the cutouts onto the canvases. Then, we (well, my auto painter husband) spray painted them bone white so that light wouldn't shine through the bulk of the painting:


So, now, you can see that light only shines through where the cutouts were taped to the canvas.

Originally, I printed out two copies of the designs, because I wasn't sure how well the cardstock would handle the spray paint. It turns out that the cardstock cutouts for MOST of the were fine, so I went ahead and cutout additional pieces from some of the painted cutouts, and some from my gray cardstock copies:


This created not only areas where more light could shine through when the painting was turned on, but also made a 3D effect that would make the painting look pretty even when the lights were off, especially after they were painted.

Next, I stuck the cutouts to the canvas using photo mounting tape so that the cutouts would sit above the areas that hadn't been spray painted:


And here's what the Desert Highway painting looked like at this stage:


As you can tell, my printer was running out of ink at this point, but it wasn't going to matter, because I painted over the cutouts next:


Finally, I started putting the lights into the canvas frame using furniture tacks:


Now, you can't tell from this shot, but, by this point, I had realized that the battery powered lights weren't going to work. I suppose that, if I wanted to spend $7 - $10 per string of the party grade, fancy, LED, battery powered light strings (like I got for my wedding and used in my Christmas wreath this year) that the battery powered ones would have worked. Unfortunately, I am on a budget, and this meant that I had to go the cheap-o route. The Dollar Store battery powered lights were VERY cheaply made and the wires and bulbs kept trying to fall out as I hooked them to the canvas frame. Also, they were not powered by AA batteries as I expected, but, rather, C size batteries, and that made the battery box too large to fit into the canvas frame.

So, I went looking for short strings of outlet powered LED Christmas lights. This, also proved to be a struggle, as most stores don't carry 10-20 bulb strings of white Christmas lights anymore. The more common (and more pricy) 50-100 bulb strings were not going to work, either, as my canvas was 9" by 14", and that many lights weren't going to fit in there.

Eventually, though, we found 35-light strings of COLORED LED strings. My husband took these strings all apart and made each string (mostly) one color strings: red, orange, yellow/clear, and green with a couple of blue bulbs (we'd also found two strings of clear, 20-bulbs strands). So, now, all six paintings had lighting, and I inserted these into the canvas frame. Here are shots of the finished products:
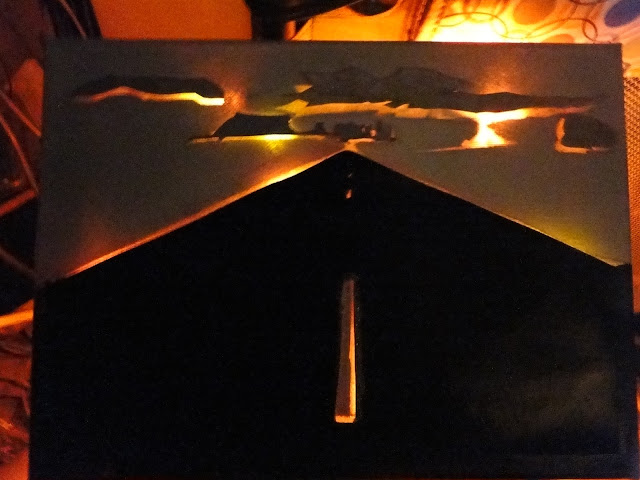

Desert Highway Backlit 3D Painting by Charity Luthy
Desert Highway - Backlit Painting by Charity Luthy


Acoustic Guitar Backlit Painting by Charity Luthy
Acoustic Guitar - Backlit Painting by Charity Luthy

Dark Clouds Backlit Painting by Charity Luthy
Dark Clouds - Backlit Painting by Charity Luthy

Lighthouse Backlit Painting by Charity Luthy
Lighthouse - Backlit Painting by Charity Luthy
Butterfly Flowers Backlit Painting by Charity Luthy
Butterfly Flowers - Backlit Painting by Charity Luthy
Wildflowers Backlit Painting by Charity Luthy
Wildflowers - Backlit Painting by Charity Luthy

Wednesday, December 19, 2012

Plushie Monsters

Sweet Little Plush Monsters
So, I have been making a lot of Christmas presents this year, but most of them are for adults who, conceivably, might read this blog. Therefore, no posts about those presents until after the holiday.

But, I am making a few presents for my 19-month-old daughter; among them, these adorable little monsters. They were super easy (outside of the damned hot glue gun, which burned both my thumbs), and I'm outlining the process for you here.

Earlier this year - in the spring, I think - I bought a bunch of these fabric bundles called Stax by Creative Cuts. (Here's the walmart.com page for a similar product; mine are patterned.) I originally intended to make pillows out of them, but never got around to it. Anyway, when I got this idea, this fabric - I guess it's quilting fabric - seemed like a great option. I also used a bunch of fabric I had on hand - old scraps from curtain projects - to make a few more.

The first step was to make a template, as I sort of stink at freehand cutting. I just made a rounded rectangle in Paint Shop Pro and then skewed it so that it was narrower at the bottom. Then, I printed it out, cut it out of the paper, and then started cutting the fabric shapes:


I wanted to make a set of monsters, one of each type of fabric I had, but my older daughter also wanted a set of these when she saw my idea, so I ended up cutting out enough rounded rectangles for 16 monsters, total, or 32 pieces of fabric. I laid the fabric so that I was cutting out 4 pieces at a time, fronts and backs for two monsters out of each pattern.

Next, I sewed the edges except for a spot to stuff them with:


And then turned them right side out:


Then, I stuffed them:


And sewed the stuffing hole closed:


This particular bit was a bit difficult, as I am not real experienced with closing seams so you can't see them. There is probably a tutorial on the Internet somewhere about how to do this part right, but the Internet was down when I was doing this because the weather looked like this:


Anyway, the closing didn't take a whole long time (about an hour and half or so), and I finally had my monster sets:


Next, I took some puffy fabric paint and drew facial fatures: mouths, mustaches, tongues, and fangs/teeth...


Once the paint dried, I used a hot glue gun to stick on some googly eyes, and we finally had our finished monsters:


A few things: I noticed that the heat from the glue gun actually started to melt the plastic in the googly eyes, so maybe another adherent would be a better choice. I experimented with a couple other glues with these eyes for another project and found that my 19-month-old could pull off the eyes with everything except the hot glue. Secondly, white acrylic paint might be better for the teeth, as the white puffy paint turned clear when it dried and it really doesn't look quite right. I'll probably go over the parts that are supposed to be white with some white paint later, just to make them look right.

Anyway, hope you enjoyed this little jounrey of making monsters!


Introduction - Hi There!

I have been thinking about starting this blog for some time, and, originally, I was going to post it to my other blog, Book of Shadows, but I thought that these sorts of projects sort of needed their own breathing room apart from my music and writing projects. So, here we are, only two years after originally having this brainstorm.

I've always been a creative person. I like making stuff, whether it be new books, new songs, new paintings, crafts, home repair, problem solving, web design, graphic design... whatever. With the advent of Pinterest, these little creative endeavors have gotten more and more frequent, and now, I think I have enough of them (with pictures!) to start showing them to other people.

So, that's what this blog is going to be about: things I cook for my family, things I make, ways I decorate my home. I hope that you enjoy reading about my projects as much as I enjoy making them. :)