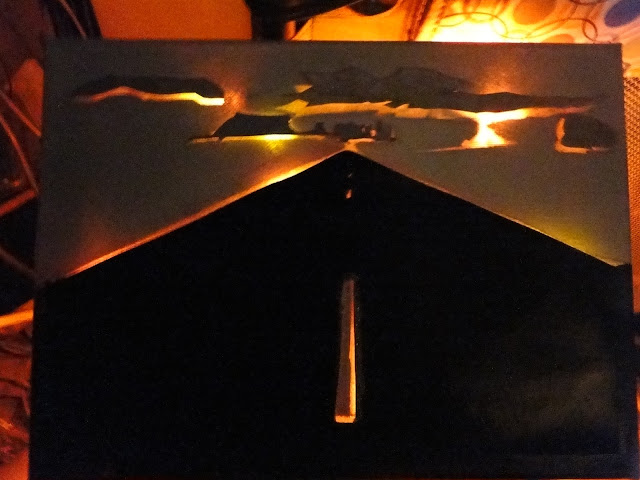
So, I mentioned in my previous post that I had handmade most of the Christmas presents I gave out this year. With the holidays past us, I can now share this process with you. One of the things I made for everyone on my "big presents" Christmas list were these back lit, 3D paintings.
Now, I have started spending more time than I really care to admit on Pinterest, and I see a LOT of things that I want to try doing. That being said, I'm a creative sort, and I always try to make my own spin on whatever I try to do.
So, I was on Pinterest this past spring, and I saw this really cool cloud painting:
...which I ADORE. Then, later, I saw another backlit painting, but this one had cutouts that let more light through. It was made out of metal, which is something I am not capable of working with, but it was so pretty that I knew that someday I would have to do it.
Nearing Christmas time, I saw on the 30 Days of Pinsperation feature on Pinterest that someone else had tackled the metal backlit painting, but done it smaller and with cardstock:
That's the original metal backlit art on the left and the cardstock version on the right.
The little wheels in my head got to turning, and I thought: "Why not combine the two paintings?"
So, I did.
First, I found a deal at Michael's (the craft store) for 7 canvases for $20, and then I bought 6 sets of battery powered Christmas lights from the Dollar Store. My original idea was to have the paintings battery powered so that they could be hung anywhere, not just in close proximity to a power outlet. You'll see why this changed momentarily.
Next, step: I printed out a bunch of designs onto pale green cardstock I had lying around:
Next, I cut the main images out of the cardstock:
Then, I made double-stick tape out of masking tape (just rolled it into little cylinders) and stuck the cutouts onto the canvases. Then, we (well, my auto painter husband) spray painted them bone white so that light
wouldn't shine through the bulk of the painting:
So, now, you can see that light only shines through where the cutouts were taped to the canvas.
Originally, I printed out two copies of the designs, because I wasn't sure how well the cardstock would handle the spray paint. It turns out that the cardstock cutouts for MOST of the were fine, so I went ahead and cutout additional pieces from some of the painted cutouts, and some from my gray cardstock copies:
This created not only areas where more light could shine through when the painting was turned on, but also made a 3D effect that would make the painting look pretty even when the lights were off, especially after they were painted.
Next, I stuck the cutouts to the canvas using photo mounting tape so that the cutouts would sit above the areas that hadn't been spray painted:
And here's what the Desert Highway painting looked like at this stage:
As you can tell, my printer was running out of ink at this point, but it wasn't going to matter, because I painted over the cutouts next:
Finally, I started putting the lights into the canvas frame using furniture tacks:
Now, you can't tell from this shot, but, by this point, I had realized that the battery powered lights weren't going to work. I suppose that, if I wanted to spend $7 - $10 per string of the party grade, fancy, LED, battery powered light strings (like I got for my wedding and used in my Christmas wreath this year) that the battery powered ones would have worked. Unfortunately, I am on a
budget, and this meant that I had to go the cheap-o route. The Dollar Store battery powered lights were VERY cheaply made and the wires and bulbs kept trying to fall out as I hooked them to the canvas frame. Also, they were not powered by AA batteries as I expected, but, rather, C size batteries, and that made the battery box too large to fit into the canvas frame.
So, I went looking for short strings of outlet powered LED Christmas lights. This, also proved to be a struggle, as most stores don't carry 10-20 bulb strings of white Christmas lights anymore. The more common (and more pricy) 50-100 bulb strings were not going to work, either, as my canvas was 9" by 14", and that many lights weren't going to fit in there.
Eventually, though, we found 35-light strings of COLORED LED strings. My husband took these strings all apart and made each string (mostly) one color strings: red, orange, yellow/clear, and green with a couple of blue bulbs (we'd also found two strings of clear, 20-bulbs strands). So, now, all six paintings had lighting, and I inserted these into the canvas frame. Here are shots of the finished products:
 |
| Desert Highway - Backlit Painting by Charity Luthy |
 |
| Acoustic Guitar - Backlit Painting by Charity Luthy |
 |
| Dark Clouds - Backlit Painting by Charity Luthy |
 |
| Lighthouse - Backlit Painting by Charity Luthy |
 |
| Butterfly Flowers - Backlit Painting by Charity Luthy |
 |
| Wildflowers - Backlit Painting by Charity Luthy |


