Showing posts with label art. Show all posts

Wednesday, February 25, 2015

Kitchen Sputnik Starbursts

I have fallen in love with vintage-style starbursts. I adore them, those long-legged, atomic, Sputnik-style stars. And I started putting them in my kitchen when we put up tile and painted last year. I continued that design as I finished the kitchen and hallway remodel this year.

After painting the whole kitchen and hallway the same color (Angel Food by Behr) as the rest of the kitchen, I stuck chrome Sputnik stars in automotive chrome vinyl stickers all over the kitchen wall as an accent wall. In the various sizes, it looks like a retro star field, and I am thrilled with it. Take a look:


Monday, September 8, 2014

What Can You Make With Barbeque Skewers & Dental Floss?


BBQ skewers from the dollar store +
2 rolls of freebie dental floss from the dentist =
What??
I was reading the latest issue of HGTV Magazine on my Nook Sunday morning while watching the Steelers game and saw this decorative spiky ball thing. The article said it was $25 at zgallerie.com (though the price today on that link is $29.95). With school back in session and a ton of things to budget for with winter approaching, even that is not in my budget. But I really wanted that spiky, atomic-style ball. And that got me to thinking: how could I make one with stuff I already have? Lightbulb time! BBQ skewers and dental floss!

Crazy, right? I have an old tissue box almost full of sample containers of dental floss that I have collected over the years of taking the kids to the dentist, and I have two packages of BBQ skewers I got at the dollar store, and BBQ skewers tied together a certain way would look an awful lot like that spiky ball thing.

So, Steelers game over (Steelers won in a squeaker!), I grabbed a box of floss and the skewers and set to work. I tied the floss to one skewer right in the middle, and then started twisting the floss around more and more skewers at odd angles until I got this:


But it needed a coat of paint. I had purchased a can of chrome spray paint a couple months ago for another project and had some left, so I spray painted it with that, and the end result of an hour of tinkering with random objects got me this:


It looks great! It shimmers and shines in the light, and it cost me a grand total of $1 to make. Can't complain about that, and it looks AWESOME sitting next to my retro lamps. :)

Friday, July 11, 2014

Duct Tape Canister

If you've read my post about making decorator bins out of cereal boxes, you'll know that I am always repurposing stuff. I have had my eye on this cardboard bread crumb canister since I bought it, and I saved a couple of them, but someone threw them away. Anyway, I finished another box of these last night, and decided today - after I had run out of work stuff to do - to do what I was planning.

You see, I had purchased a roll of retro-ish decorator Duck brand duct tape, so I took this...


...and made it into this:


I don't know what I am going to do with it yet, but it looks pretty cool for a five-minute project.

Thursday, October 3, 2013

Wax Lotus Flower

Last night, I went grocery shopping. (Pity me.) It was AWFUL.

But afterward, I got to watch Nashville and have some apple wine and white cheddar Babybel cheese. Shelby ate a lot of the cheese, which is why she is eating a lot of fruit today. Anyway, I saved the wax coverings from the cheese and made this while watching TV:


Sunday, June 30, 2013

Pyrography - iPhone4 Case

Custom wood burned iPhone4 wooden case - pyrography is awesome!
I have wanted to have a wooden iPhone case from the first moment that I realized that my iPhone that Verizon gave to me for free would need one in order to take a call and not drop it. (Seems to me that is normal cell phone activity - the ability to take a call and stay on the line until you're through - but, in the case of iPhone 4... apparently no.)

In any case (pun intended), I wanted a wooden iPhone case because I thought that it would be pretty unique, especially when I got done customizing it with pyrography, the art of burning designs into wood...something I have done quite extensively in the past but that I haven't done in years due to work, college, graduate school, etc, etc, etc.

Anyway... so I bought a wooden case off of Amazon some time ago, but I never got around to putting the design on it before my 2-year-old broke the case. Broke the back of the iPhone, too, come think of it. Recently, I bought another wooden case and, this time, I actually did the pyrography work.

I had decided long ago that I wanted to memorialize my car - my 1971 Ford LTD Brougham - on the iPhone case, so I printed out a scaled outline version of the car from the front - where it looks really angry and mean, TBH - and taped it to the outside of the phone and then drew over the lines with a ballpoint pen. Here is what it looked like at that point:

You can sort of see the outline there in that shot.

Next, I dug out my old, trusty wood burning tool and plugged it in and set to work. I realized that, unlike my first wooden case, this one has a coating of some sort on it. So, I cut through it with a precision screwdriver and finished the design... and I realized it was missing something, so I freehand burned in a crescent moon, three retro-looking stars, and the '71 at the bottom. Then I put a coat of clear spray paint on it to seal it, and, once dry, I Super Glued the two pieces around the phone so that the baby won't be able to get it off if she gets a hold of the phone again.


Friday, December 28, 2012

Backlit Paintings

Desert Highway Backlit Painting by Charity Luthy
So, I mentioned in my previous post that I had handmade most of the Christmas presents I gave out this year. With the holidays past us, I can now share this process with you. One of the things I made for everyone on my "big presents" Christmas list were these back lit, 3D paintings.

Now, I have started spending more time than I really care to admit on Pinterest, and I see a LOT of things that I want to try doing. That being said, I'm a creative sort, and I always try to make my own spin on whatever I try to do.

So, I was on Pinterest this past spring, and I saw this really cool cloud painting:


...which I ADORE. Then, later, I saw another backlit painting, but this one had cutouts that let more light through. It was made out of metal, which is something I am not capable of working with, but it was so pretty that I knew that someday I would have to do it.

Nearing Christmas time, I saw on the 30 Days of Pinsperation feature on Pinterest that someone else had tackled the metal backlit painting, but done it smaller and with cardstock:


That's the original metal backlit art on the left and the cardstock version on the right.

The little wheels in my head got to turning, and I thought: "Why not combine the two paintings?"

So, I did.

First, I found a deal at Michael's (the craft store) for 7 canvases for $20, and then I bought 6 sets of battery powered Christmas lights from the Dollar Store. My original idea was to have the paintings battery powered so that they could be hung anywhere, not just in close proximity to a power outlet. You'll see why this changed momentarily.

Next, step: I printed out a bunch of designs onto pale green cardstock I had lying around:


Next, I cut the main images out of the cardstock:


Then, I made double-stick tape out of masking tape (just rolled it into little cylinders) and stuck the cutouts onto the canvases. Then, we (well, my auto painter husband) spray painted them bone white so that light wouldn't shine through the bulk of the painting:


So, now, you can see that light only shines through where the cutouts were taped to the canvas.

Originally, I printed out two copies of the designs, because I wasn't sure how well the cardstock would handle the spray paint. It turns out that the cardstock cutouts for MOST of the were fine, so I went ahead and cutout additional pieces from some of the painted cutouts, and some from my gray cardstock copies:


This created not only areas where more light could shine through when the painting was turned on, but also made a 3D effect that would make the painting look pretty even when the lights were off, especially after they were painted.

Next, I stuck the cutouts to the canvas using photo mounting tape so that the cutouts would sit above the areas that hadn't been spray painted:


And here's what the Desert Highway painting looked like at this stage:


As you can tell, my printer was running out of ink at this point, but it wasn't going to matter, because I painted over the cutouts next:


Finally, I started putting the lights into the canvas frame using furniture tacks:


Now, you can't tell from this shot, but, by this point, I had realized that the battery powered lights weren't going to work. I suppose that, if I wanted to spend $7 - $10 per string of the party grade, fancy, LED, battery powered light strings (like I got for my wedding and used in my Christmas wreath this year) that the battery powered ones would have worked. Unfortunately, I am on a budget, and this meant that I had to go the cheap-o route. The Dollar Store battery powered lights were VERY cheaply made and the wires and bulbs kept trying to fall out as I hooked them to the canvas frame. Also, they were not powered by AA batteries as I expected, but, rather, C size batteries, and that made the battery box too large to fit into the canvas frame.

So, I went looking for short strings of outlet powered LED Christmas lights. This, also proved to be a struggle, as most stores don't carry 10-20 bulb strings of white Christmas lights anymore. The more common (and more pricy) 50-100 bulb strings were not going to work, either, as my canvas was 9" by 14", and that many lights weren't going to fit in there.

Eventually, though, we found 35-light strings of COLORED LED strings. My husband took these strings all apart and made each string (mostly) one color strings: red, orange, yellow/clear, and green with a couple of blue bulbs (we'd also found two strings of clear, 20-bulbs strands). So, now, all six paintings had lighting, and I inserted these into the canvas frame. Here are shots of the finished products:
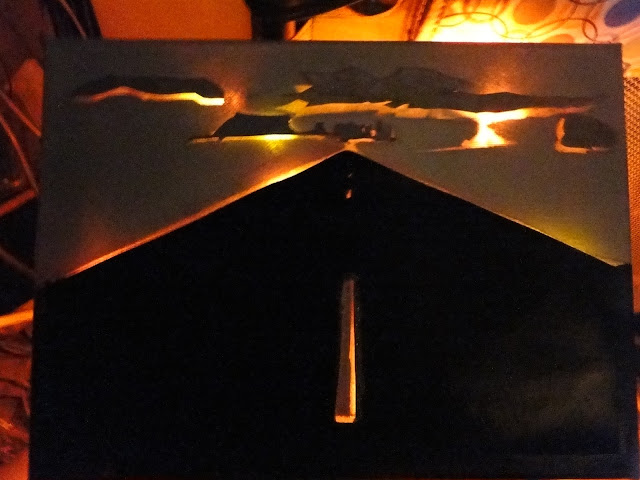

Desert Highway Backlit 3D Painting by Charity Luthy
Desert Highway - Backlit Painting by Charity Luthy


Acoustic Guitar Backlit Painting by Charity Luthy
Acoustic Guitar - Backlit Painting by Charity Luthy

Dark Clouds Backlit Painting by Charity Luthy
Dark Clouds - Backlit Painting by Charity Luthy

Lighthouse Backlit Painting by Charity Luthy
Lighthouse - Backlit Painting by Charity Luthy
Butterfly Flowers Backlit Painting by Charity Luthy
Butterfly Flowers - Backlit Painting by Charity Luthy
Wildflowers Backlit Painting by Charity Luthy
Wildflowers - Backlit Painting by Charity Luthy